
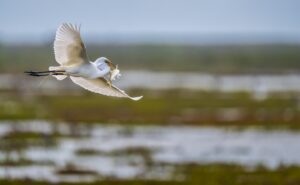
 A bird lifts from the marsh, banks into the light, and is gone before you can say, “Wait, where did it go?” That is exactly why learning how to photograph birds in flight can feel equal parts thrilling and humbling. The good news: sharp, expressive flight images are not reserved for photographers with the newest camera body or the longest lens. They come from preparation, repetition, and a willingness to miss a few frames while you learn.
The goal is not simply to freeze wings. A memorable flight photograph has intention. The bird is sharp, the background supports rather than distracts, and the pose shows a little personality—a raptor’s intense stare, a heron’s long neck reaching forward, or a roseate spoonbill glowing pink against a Texas sky.
How to Photograph Birds in Flight Starts Before Takeoff
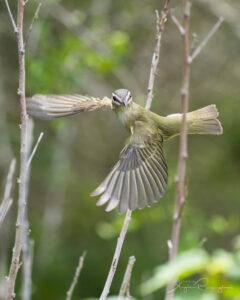 The best bird-in-flight photographers look prepared long before a bird enters the frame. They know the light direction, the birds’ likely flight paths, and how their camera will respond when the action begins.
Start by watching the birds without bringing the camera to your eye. Do egrets leave the rookery in the same direction? Are terns repeatedly diving over one stretch of water? Is a hawk using the same wind current along a ridge? Birds are more habitual than we often realize. If you can predict the flight path, you can position yourself so the bird comes toward you or crosses cleanly through a pleasing background.
Light matters just as much. Front or slightly side light will illuminate the bird’s face and reveal feather detail. Early morning and late afternoon often provide you warmer color and gentler shadows, but bright overcast conditions can be wonderful too. While a pale sky may not win every beauty contest, it provides your autofocus with a clean, uncluttered target and makes practice much easier.
Whenever possible, put the sun behind or over one shoulder and keep space between the bird and the background. A distant line of trees or water will blur more smoothly than a busy wall of branches directly behind your subject.
Start With Settings That Favor Success
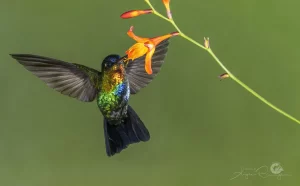 There is no single magic setting for every species, weather condition, and camera system. A hummingbird at close range demands something different than a pelican gliding along the coast. Still, a reliable starting point helps you get started quickly.
Use continuous autofocus, often labeled AF-C or AI Servo, and activate your camera’s bird, animal, or subject-detection feature if it has one. Modern tracking tools are remarkably helpful, but they are not mind readers. They work best when you first place the focus point on the bird and keep it there. If your camera is struggling against branches or waves, try a smaller focus area rather than giving it the entire frame to interpret.
For most birds in flight, begin around 1/2500 second. That speed freezes many wingbeats while leaving room to work with reasonable ISO values. Large, slow-flying birds such as herons, cranes, and eagles can sometimes be photographed at 1/1600 second. Fast ducks, swallows, kingfishers, and diving terns may need 1/3200 or 1/4000 second, especially if you want every feather crisp.
Set an aperture that gives you a little breathing room. Around f/5.6 to f/8 is a practical range for many telephoto lenses. At wide apertures, a bird turning toward you can move its eye and wingtip onto different focus planes. Stopping down slightly can improve your keeper rate without making the background look busy.
Auto ISO is a useful tool in changing light. Set a minimum shutter speed, choose the aperture you want, and allow the camera to adjust ISO as birds move from bright sky to darker trees. Do not be afraid of a moderately high ISO if it protects your shutter speed. A slightly grainy sharp image is far more useful than a beautifully clean blur.
If your camera offers back-button focus, give it an honest try. Separating focus from the shutter button can make tracking easier, since you can keep focus engaged while firing short bursts. It feels awkward for a day or two, and then many wildlife photographers wonder how they ever worked without it.
Find the Bird, Then Let It Fly Into the Frame
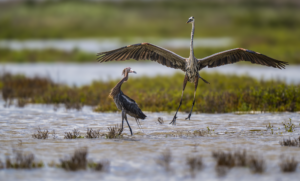 The hardest part is often acquiring the bird through a long lens. A 500mm or 600mm view can feel like trying to find a moving airplane through a straw. The solution is simple, though not always straightforward: keep both eyes open.
Use your unaided eye to follow the bird, bring the lens smoothly to your face, then find it in the viewfinder. Avoid swinging the lens wildly after a bird that is already past you. Instead, pick it up early and match its speed with a steady pan. Your feet matter here. Stand comfortably, turn from your hips, and avoid locking your knees like you are posing for a school picture.
Once the bird is in the frame, keep the focus point near its head or upper body and pan smoothly. Press the shutter in short bursts rather than holding it down for every second of the encounter. Short bursts give your camera time to refocus, reduce the mountain of nearly identical files waiting at home, and help you stay engaged with the bird’s movement.
Give the bird room to fly into. If it is traveling left, place it slightly left of center with open space in front of its path. This small composition choice makes an image feel more natural and gives the viewer somewhere to look. Centered compositions can work beautifully for a head-on approach, particularly when the wings are symmetrical, but do not center every bird by habit.
Practice on Birds That Give You More Chances
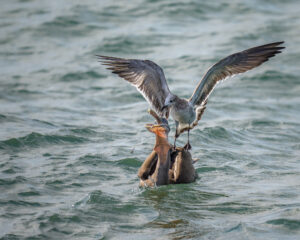 You do not need to begin with a peregrine falcon at full speed. That is like learning to drive in rush-hour traffic during a thunderstorm. Start with gulls, pelicans, herons, ibises, geese, ducks, or black vultures. They are large, predictable enough to track, and often available near lakes, ponds, coastlines, and city parks.
Practice against a clear sky first. Yes, a blue-sky image may feel less exciting than a bird framed by a dramatic forest or mountain backdrop, but it lets you focus on the mechanics: holding the bird in the frame, tracking its head, and choosing the right shutter speed. Once that feels comfortable, add complexity with water, trees, changing backgrounds, and birds flying toward you.
It also helps to practice panning on subjects that are not birds. A passing bicycle, a dog running across a field, or even a tossed tennis ball can teach your hands and eyes to work together. The bird will not know you practiced on a golden retriever first.
Solve the Most Common Flight Photography Problems
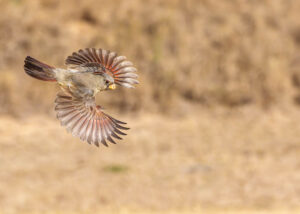 If your bird is consistently soft, first check shutter speed. Motion blur can look very similar to missed focus, especially around wing edges. Raise your shutter speed before assuming your autofocus system is failing.
If the background is sharp but the bird is not, your focus point likely slipped off the subject. Try a more controlled autofocus area, begin tracking earlier, and keep the bird larger in the frame until your technique improves. Cropping is useful, but severe cropping cannot rescue a bird that was only a tiny speck in the original image.
If your sky looks white or your bird is too dark, pay attention to exposure compensation and your histogram. Bright skies can fool a camera into underexposing the bird, while dark trees can cause blown highlights in white feathers. For birds with bright plumage, check your highlights often. It is much easier to lift a slightly dark shadow than recover detail from a pure white patch on an egret’s wing.
And if you have hundreds of frames but none feel special, slow down during editing. Look for the frame with the best head angle, clear eye, wing position, and cleanest background. The sharpest image is not always the strongest one. A bird banking toward you with a catchlight in its eye may beat a technically perfect side profile every time.
Let the field teach you.
 Bird photography rewards patience in a very practical way. Return to the same place, notice what changes with wind and light, and make one adjustment at a time. Maybe tomorrow you raise your shutter speed. On the next outing, you work on keeping both eyes open. Small improvements add up faster than trying to fix everything in one morning.
At Jeff & Angie Photography workshops, we see this confidence grow in the field all the time. A photographer who starts the day nervous about autofocus can finish it tracking pelicans over water with a big grin and a card full of keepers. Bring your camera outside, accept the occasional spectacular miss, and stay ready. The next bird may give you only one pass, but it might be the one you remember.