
First, it gives you more control over the final image. You can adjust the shutter speed, aperture, and ISO to get exactly the look you are going for.
Second, it forces you to slow down and really think about each shot. In automatic mode, it’s easy to just snap away without really paying attention to what you’re doing.
But when you’re in manual mode, you have to be more intentional about every click of the shutter. And finally, you might just find it more enjoyable. It’s like a little puzzle to figure out each setting, and I know I love the challenge of getting it just right. So those are a few reasons to shoot in manual mode. The more you use manual mode, the quicker you will get. I typically set my aperture and shutter, then just the ISO as light conditions change. I will also adjust the shutter and aperture to achieve different looks of the same subject.
When most people first start photography, they use the automatic mode on their cameras. It is easy and carefree, just pointed and shot. But you quickly realized that the automatic mode is limiting your creativity. You want to be able to control every aspect of your photos, from the aperture to the shutter speed. It is challenging at first, but it is also immensely rewarding.
Now that you will be shooting in manual mode, you will get what you wanted and the sunset/sunrise as you saw it. With some practice you can even capture photos of things your naked eye has never seen. More on that in another vlog; please subscribe.
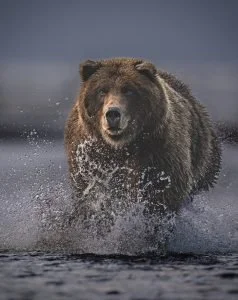
What is aperture?
Aperture is one of the key settings on your camera, and it plays a big role in how your photos turn out. But what exactly is aperture, and why is it crucial? Aperture refers to the opening in your camera lens through which light passes. The size of the aperture affects how much light enters the camera, and the amount of light in turn affects things like shutter speed, ISO, and depth of field.
A wider aperture (a small f-stop number) lets in more light and results in a shallower depth of field. A narrower aperture (a large f-stop number) lets in less light and provides a greater depth of field. So why is this factor important? Depending on the effect you want to achieve, you’ll need to choose an appropriate aperture setting.
For example, if you’re shooting a landscape shot, you’ll probably want to use a narrower aperture so that everything appears sharp and in focus. Something like f/16. On the other hand, if you’re taking a portrait, you might want to use a wider aperture. Something like f/4 to blur the background and make your subject stand out. So the next time you’re behind the camera, take some time to experiment with different aperture settings to see what effects you can achieve.
Aperture is one of the three elements that control the amount of light that enters your camera. But what does aperture do, exactly? Well, when you decrease the size of your aperture, you let in less light. This might not seem important, but it has a significant effect on the final image. A smaller aperture results in a shallower depth of field. This means that objects in the foreground will be in focus, while objects in the background will be blurry.
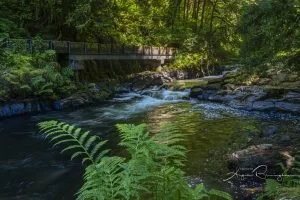
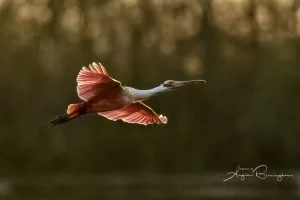
This technique can be used to create beautiful portraits with dreamy, soft backgrounds. Alternatively, a larger aperture results in a greater depth of field. This means that both the foreground and background will be in focus. This is ideal for landscape shots where you want everything to be sharp and clear. So, as you can see, aperture is a pretty important element of photography! Here are some examples.
What is shutter speed, and why is it important?
Shutter speed is the length of time that a camera shutter is open to expose light to the camera sensor. Shutter speed is measured in seconds or fractions of a second. A shorter shutter speed will result in a photo with less light, but a longer shutter speed will result in a photo with more light.
The amount of light that enters during exposure depends on the light source’s intensity and the aperture’s surface area. A low-light situation (like nighttime) will require a longer shutter speed to let in more light, whereas a bright sunny day will require a shorter shutter speed.
Shutter speed also determines how much motion blur will be in your photo. A fast shutter speed (like 1/1000 of a second) will freeze action and result in a sharp image, while a slow shutter speed (like 1 second) will capture motion and result in a blurred image.
There is no “correct” shutter speed, but understanding how it works will help you to take better photographs. Practice experimenting with different shutter speeds to see how it affects the final image.
Shutter speed is a measure of the amount of time that the shutter is open while taking a photo. A longer shutter speed will result in a brighter image, but it will also increase the chance of blurriness if the subject is moving. A shorter shutter speed will produce a darker image, but it will be less likely to be blurry. Shutter speed is an important factor in photography and can create various effects.
For example, a slow shutter speed can be used to capture the blurred movement of water or wind, while a fast shutter speed can be used to freeze a moment. In general, faster shutter speeds are better for capturing action, while slower shutter speeds are better for capturing detail. Experimentation is the key to finding the right shutter speed for each situation. Look at the images above. The slow shutter speed smoothed the water, while the fast shutter speed froze the bird in flight.
Understanding ISO: Think of It Like a Radio Volume Knob
ISO can feel confusing at first, so I like to compare it to the volume knob on a radio.
When the radio signal is strong and clear, you do not need to turn the volume up very high. However, when the signal is weak, you may need to increase the volume so you can hear it.
ISO works in a similar way.
When plenty of light reaches your camera sensor, you can use a low ISO, such as ISO 100 or 200. This usually gives you a cleaner image with less digital noise.
When the light is low, you may need to raise the ISO. Increasing the ISO makes the image appear brighter. However, just like turning up a weak radio signal, it can also make the unwanted noise more noticeable.
In photography, that unwanted noise may appear as graininess, rough texture, or reduced detail.
For example, imagine you are photographing a fast-moving bird in low light. You still need a quick shutter speed to freeze the motion. Therefore, you may need to raise the ISO to create a properly exposed image.
On the other hand, a still subject gives you more options. You may be able to use a slower shutter speed, a tripod, or a wider aperture. As a result, you may not need to raise the ISO as much.
The goal is not always to use the lowest ISO possible. Instead, use the ISO you need to get the photograph.
A sharp image with a little noise is usually better than a blurry image with no noise.
So remember the radio volume theory:
Low light is like a weak signal. Raising the ISO is like turning up the volume. It helps you see the image, but it may also make the noise louder.
The key is finding the right balance for the scene in front of you.
To look up your camera and the recommended max. ISO follow this link and search for your camera.
My Sony A1’s recommended high ISO is 3163 ISO, but from experience and exposure to the right light, I can push it to 12,800 ISO in some situations.
My Sony A7 IV’s recommended high ISO is 3379 ISO, but from experience and exposure to the right light, I can push it to 12,800 ISO in some situations.
If you would like to book a class with me, just contact me here